Experimental Furniture & Home Decor using Ceramic 3D Printing
During the year 2021, I had the opportunity to explore the possibilities and limitations of a 3D ceramic printer.
Not just any ceramic printer, but the heavy duty Potterbot Scara V4 Ceramic 3D Printer.
(This page is more of a documentation of my progress and understanding of the 3D ceramic printer)
Details


Tile 6 - 20 Lbs
EPK - 15 Lbs
OM4 - 20 Lbs
Goldart (cedar heights yellow bag) - 25 Lbs
Nepheline syenite A270 - 10 Lbs
Silica - 10 Lbs
Bentonite - 3 Lbs
Molochite 80 (Coarse) - 5 Lbs
Molochite 200 (Fine) - 15 Lbs
Toilet paper - 1 roll
Water - 25 Lbs


Studying the PotterBot through smaller objects (The Start)
I kept the first few projects with the printer rather small. My goal was to explore textures and the translation of visual accuracy of what I created on Rhinoceros 3D as compared to how it was actually printed on by the machine.


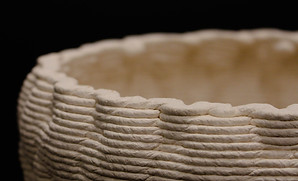
This was the first object I 3D printed. It is supposed to resemble bubbles. Because the nozzle where the clay comes out from is way bigger than the precise millimeters I had to create it in, a lot of the details got overlapped and erased due to the clay.
What intrigued me though was the textures and patterns formed on the inner wall because I had created it to be a straight clean wall for the inside.

I created cuban chains on Rhinoceros 3D to study how 3D designs get translated when printed using clay.
As one can see, the chains look more like DNA helixes. This is because the model needed to be more pronounced than I assumed in order for the machine can capture the details better.

The second object I created was a vase. On one side, I create a single chain with the chain set to be printed out bigger than last time. I also used a smaller nozzle to capture the essence of a chain more accurately.


The was not meant to be the last trial for experimenting with smaller objects, however, I really liked how the chain detailing came out this time.

Mid print pictures


In use shots


Part 2 - Making the chair prototype
Before making the ergonomic and fit to human measurements chair, I started off with a small prototype to study whether form could follow the function.
To test the chair in scientifically, I kept placing coins on it. This helped me understand the amount of weight the actual chair would be able to withstand. (Not shown in pictures)
What I learnt was that the front of the chair was stronger because of the intersection. The absence of intersection amongst the curves in the back of the chair, puts strain on a single area due to lack of weight distribution, thereby lowering its durability against pressure.
I also needed to make the backrest shorter for the actual chair as it was not strong enough to withstand a back resting on it and because there was a limit to the amount of clay that I could make.


The intersection
No intersection
Making the chair

Small midprint process pictures of intersections and the pattern the clay created
As the height of the chair grew, it started to bend sideways. It also started to shrink as the clay started to dry (considering the print was 5 hours long).
The wet sponges helped delay the drying process, thereby keeping the layering of clay regular.


During drying, I had to switch from wet sponges to dry wooden platforms so that the moisture was properly absorbed. It also helped keep the walls straight during drying time.
Transporting the chair required two people, especially before it dried and was put in the walk in kiln.
It also was only taken around on a trolley before it was baked


Product photoshoot (before editing)
Final Pictures


